SciLifeLab Serve allows hosting of web applications built with the Shiny framework. Shiny is primarily used to create apps with R code although there is now a Shiny for Python as well. Shiny apps can contain interactive visualisations, tables, text, analysis tools, and more.
If you prefer to watch a video tutorial instead see this recording of a webinar about Shiny app hosting on SciLifeLab Serve.

Introduction
SciLifeLab Serve allows hosting of Shiny apps free of charge to researchers in life sciences working at a Swedish research institution as well as their collaborators abroad. The data and code behind each app hosted on SciLifeLab Serve need to be made publicly available. All apps hosted on SciLifeLab Serve are publicly available through a URL in the form of x.serve.scilifelab.se. Currently, only apps that have been packaged as a Docker container image are supported (see the instructions below for how to do that). At SciLifeLab Serve we recommend using Shiny Server to run the Shiny app and combine it with ShinyProxy behind the scenes to ensure that the apps run smoothly.
Each Shiny app hosted on SciLifeLab Serve receives 2 vCPU and 4 GB of memory/RAM by default. These can be requested to be increased up to 12 vCPU and 48 GB of memory/RAM if need is demonstrated (this means that you provide an example of a likely user interaction, for example user input, where having higher resources allocated will make a significant difference to performance).
Step-by-step guide
This step-by-step guide will walk you through creating and publishing a Docker container image with your Shiny app, registering on SciLifeLab Serve, creating a project, and, finally, creating an app inside your project. We have not gone into detail explaining each of the tools and settings we used during the process in order to streamline the instructions. We welcome contributions and suggestions for improvement of this guide.
As of now, SciLifeLab Serve only allows to host Shiny applications if they are packaged as Docker images (Docker is a powerful and widespread tool for deployment of applications). Packaging your R shiny application as a Docker image is relatively straightforward, so do not be concerned if you have never done this before. The first steps of this guide will explain in detail how to do just that. If you run into an issue you cannot resolve, the SciLifeLab Serve team is happy to help you with this through a free individual consultation, get in touch with us by e-mailing serve@scilifelab.se.
Step 1. Save information about required R packages
In this example, we will assume that the Shiny app code is located in a file called app.R and that this file as well as the app's dependencies (e.g., associated data) are located in the folder called 'app'. Make sure that your app runs as it should with this structure (for example, if you run it using RStudio). Here is the file structure that we assume:
..
└── app/
│   ├── app.R
│   ├── dataset1.csv
│   └── dataset2_folder/
First you need to save information about the R packages that your app needs to function. The best way to do this is by creating an environment file using the renv package. In your R session, run the following commands:
install.packages("renv")
library(renv)
renv::snapshot(type = "implicit")
This should create a renv.lock file in your Shiny app directory. This file has information about all packages required for your app.
..
├── app/
│   ├── app.R
│   ├── dataset1.csv
│   └── dataset2_folder/
└── renv.lock
Step 2. Create a Dockerfile for your app
Docker images are built from sets of instructions given in a so-called Dockerfile. Create a file called Dockerfile (the name of the file should be exactly 'Dockerfile' and it should not have any file extension) using any text editor you have and insert the code below or simply download this example. Place this file in the parent folder of the folder 'app'.
# Base image
FROM rocker/shiny:4.4.1

# General updates
RUN apt-get update && \
    apt-get upgrade -y && \
    apt-get install -y git libxml2-dev libmagick++-dev libssl-dev libharfbuzz-dev libfribidi-dev && \
    apt-get clean && \
    rm -rf /var/lib/apt/lists/*

# Install the required packages
# Recreate the R environment using renv package
RUN Rscript -e 'install.packages(c("renv"))'
COPY /renv.lock /srv/shiny-server/renv.lock
RUN Rscript -e 'setwd("/srv/shiny-server/");renv::restore();'

# Copy the app files (scripts, data, etc.)
RUN rm -rf /srv/shiny-server/*
COPY /app/ /srv/shiny-server/

# Ensure that the expected user is present in the container
RUN if id shiny &>/dev/null && [ "$(id -u shiny)" -ne 999 ]; then \
        userdel -r shiny; \
        id -u 999 &>/dev/null && userdel -r "$(id -un 999)"; \
    fi; \
    useradd -u 999 -m -s /bin/bash shiny; \
    chown -R shiny:shiny /srv/shiny-server/ /var/lib/shiny-server/ /var/log/shiny-server/

# Other settings
USER shiny
EXPOSE 3838

CMD ["/usr/bin/shiny-server"]
Here is what your file structure should look like after you create the new files.
..
├── app/
│   ├── app.R
│   ├── dataset1.csv
│   └── dataset2_folder/
├── renv.lock
└── Dockerfile
Let us look at how you can customize the Dockerfile for your own app. In this example we started by specifying the R version on the first line, we specified 4.4.1 because that is the version with which we built the app and with which all packages will work. You should specify your own R version number here. The packages were installed by restoring the renv environment that we created earlier. Alternatively, you can install packages here using the R install.packages() command, see the section Frequently Asked Questions below for instructions on how to do that.
The folder app and its contents are copied into the image in the line COPY /app/ /srv/shiny-server/. If you use a different folder name, change the folder names in this line and lines below. If some of the dependecies of the app are located in different folders these other folders should be copied into the image separately.
You can see our example app with these files in this GitHub repository.
Step 3. Build and publish a Docker image
In order to be able to host a Docker image on SciLifeLab Serve it needs to be built beforehand and published in a so-called image registry. There are different image registries. Below, we show how to publish your image manually on DockerHub (Option A) or automatically on DockerHub or GitHub every time you make an update (Option B; this method uses GitHub Actions).
Option A: Manually building and publishing an image
You will need to have Docker Desktop installed on your computer to be able to build an image.
You will also need a user account on DockerHub to be able to publish your image there. Once you have an account, sign in with your account on Docker Desktop app (top right corner).
Ensure that Docker Desktop is running. Open Terminal (or Windows Terminal) and navigate to the folder where your app files and the Dockerfile are located.
cd path/to/your/folder
Run the Docker command to build your image as shown below. Replace your-image-name with your own image name. Note that the dot at the end of the command is important. Please note that building the image may take a while.
docker build --platform linux/amd64 -t <your-dockerhub-username>/<your-image-name>:<your-image-tag> .
Once the process is complete, your newly created image should appear on Docker Desktop under the Images. Alternatively, run the following command in the Terminal to inspect images on your computer. You should see your image in the list.
docker image ls
In order to test that the image you just built works you can run it from your computer and inspect your Shiny app. To do that, run the following command in the Terminal.
docker run --rm -p 3838:3838 <your-dockerhub-username>/<your-image-name>:<your-image-tag>
If everything went as it should, you should now be able to navigate to http://localhost:3838/ in your browser and see and interact with your Shiny app. If you see errors, correct them (see FAQ section below for some tips on how to do that)
Once you are happy with your app, navigate to Docker Desktop and find your image under Images. Pick "Push to Hub" among the options for your app image. This should publish your image on docker.io/<your-dockerhub-username>/<your-image-name>:<your-image-tag>. For example, our example app is available on docker.io/scilifelabdatacentre/shiny-adhd-medication-sweden:20240117-062028 (one of the image tags that we have). Please note that your image should stay publicly available even after your app is published on Serve because it will be fetched with regular intervals.
Option B: Automatically publishing an image
The Docker image can be built and published automatically using GitHub Actions every time you push a change to your repository containing the app code. This is a more advanced way to do it than the option described above. We recommend setting up this workflow if you can because it will minimize the need for you to do things manually every time you make a change in your app.
The repository of our example Shiny app contains an example of how to set up GitHub actions for publishing on DockerHub or on GitHub packages. See the folder .github/workflows for the two examples. Copy one of these into your own repository into the same folder and customize if needed.
For the DockerHub workflow to work with your own repository you will need to: change the repository name to your own repository; change the image name to your own image (use the following format: <your-dockerhub-username>/<your-image-name>); add DOCKERHUB_USERNAME and DOCKERHUB_TOKEN to the repository secrets (see repository settings), the token is obtained from the DockerHub account settings.
For the GitHub packages workflow to work with your own repository you do not need to make any changes. Keep in mind that the Docker image needs to be publicly available for SciLifeLab Serve to see it, the images on GitHub are not always public by default.
In both cases the workflow to build and publish an image will be triggered on push to the main branch. Each image will be published with the date and time of publication as a unique tag. To learn more about how GitHub actions work here and how you can furher customize them please see the official documentation.
Step 4. Create a user account on SciLifeLab Serve
If you do not already have a user account on SciLifeLab Serve, create an account.
Step 5. Create a project
Every app and model has to be located within a project. Projects that you have created/been granted access to can be found under My projects page.
You need to be logged in to create a project. To create a project, click on the corresponding button on that page. Choose Default project template. The name and description of the project are visible only to you and those who you grant access to the project. Once the project is created, you will be taken to the project dashboard where you can create different types of apps.
Step 6. Create an app
In order to host a Shiny App click the Create button on the Shiny App card. Then enter the information below in the form. Some of the fields are required while others are optional.
- Subdomain: This is the subdomain that the deployed app will be available at (e.g., a subdomain of 'my-cool-app' would mean that the app will be available at my-cool-app.serve.scilifelab.se). If no subdomain name is entered, a random name will be generated by default. By typing in the input box you can specify the custom subdomain name of your choice.
- Mount path: If your app is saving some data or accessing data from a folder that you would like to keep on the project’s persistent volume, select one of the mount paths defined in the project’s Settings → Storage. Selecting a mount path will attach the project storage at the corresponding path inside your container. If you do not need storage on persistent volume (all your data is inside your Shiny Docker image), choose None. If you need storage but do not see any options here, first configure mount paths in the project storage settings.
- Hardware: Amount of CPU and RAM dedicated to your app. By default there is only one option that is sufficient for most users; get in touch with us if your app needs more hardware resources.
- Port: The port that the Shiny server runs on (usually 3838). Note that we only allow ports in the range 3000-9999.
-
Image: Your username, image name and tag on DockerHub (your-dockerhub-username/your-image-name:your-image-tag) or full url to the image on a different repository. Note that each version of your app should have a unique tag. Once an image with a certain tag has been deployed once it will no longer be possible to change this version without a new tag.
-
Title: Title of the app that will be displayed on the Public apps page.
- Description: Provide a description of the app, will also be displayed on the Public apps page. This functions as an abstract describing your application.
- Subjects and keywords: Provide a few keywords describing your application, you can select from a large set of keywords.
- Permission: The permissions for the project. There are four levels of permissions for an app: 1. Private: The app can only be accessed by the user that created the app (sign in required). Please note that we only allow the permissions to be set to Private temporarily, while you are developing the app. Eventually each app should be published publicly. 2. Project: All members of the project where the app is located will be able to access the app (sign in required). Please note that we only allow the permissions to be set to Project temporarily, while you are developing the app. Eventually each app should be published publicly. 3. Link Anyone with the URL can access the app but this URL will not be publicly listed anywhere by us (this option is best in case you want to share the app with certain people but not with everyone yet). 4. Public: Anyone with the URL can access the app and the app will be displayed under Public apps page.
- Creators: List of authors for your application. You can fill out information manually or make use of, for example, ORCID IDs to fetch information automatically. You can also decide the order in which the creators will appear.
- Language of the application interface: Select the language of the text inside your application.
- Funding sources: Here you can select a funder, indicate the grant number, etc.
-
Source code URL: Provide a URL where source code of your app can be accessed. This can, for example, be a link to GitHub repository, an entry on Zenodo or Figshare or another repository. If your source code is stored with a DOI, provide a link starting with https://doi.org/.
-
Advanced settings: Path to site_dir: Only use this setting if you did not follow our template Dockerfile on this page. By default your app should be placed in the directory /srv/shiny-server/. If you instead put your app into a subdirectory, specify the name of the subdirectory here.
For our example app, the settings look as shown in the image below.
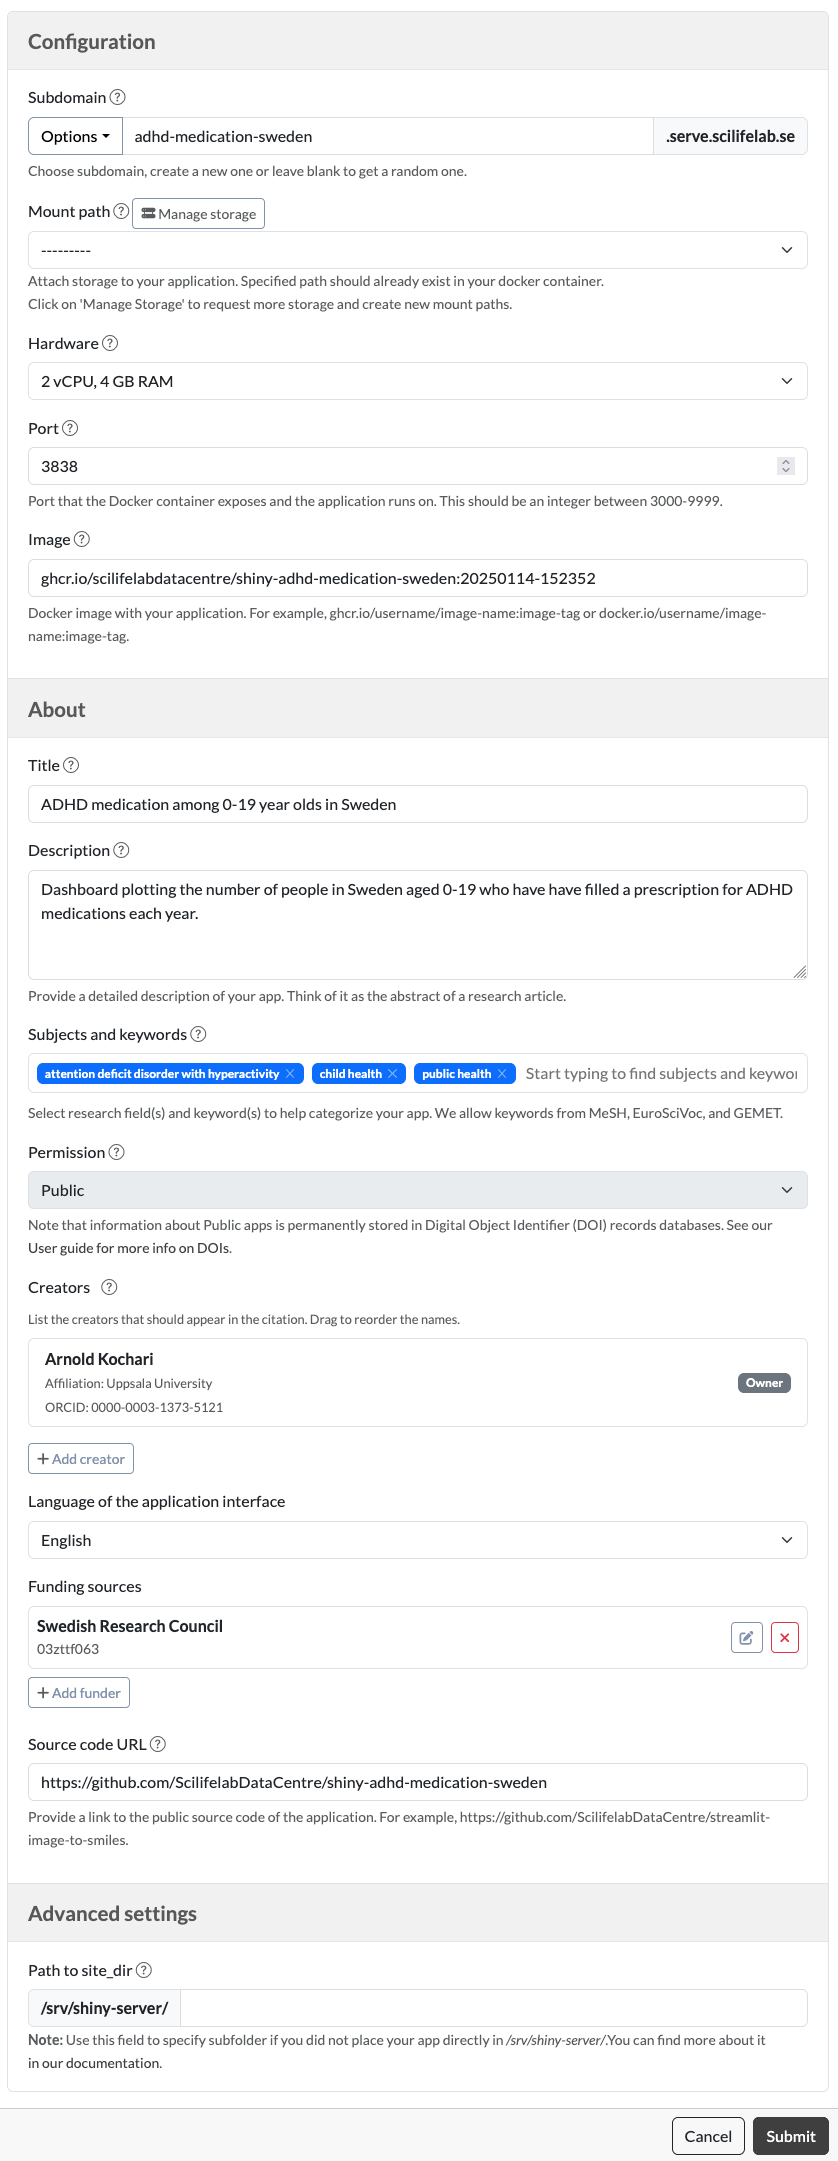
After you click "Submit", you will be taken to the page where you can see how your app is added step-by-step. Once it is done, you will be taken to the deployment overview page. Please note that even after the status is 'Running' it may take up to a couple of minutes for the app to actually start. If you chose "Link" or "Public" permissions, the app can now be accessed by anyone opening the app URL. "Public" apps are also displayed under the "Apps" page on SciLifeLab Serve.
To update your Shiny app, you need to first publish an updated container image with a new tag. Once your updated container image has been published, go the app settings page (click on the "Settings" link), change the tag in the Image field, and press on the Update button on the bottom of the form. To delete the app, press the "Delete" link next to the "Settings" link.
Frequently Asked Questions
I am stuck while following the guide. Can I get help?
Yes, feel free to get in touch with us (serve@scilifelab.se). Please provide a link to your Shiny app code and data (for example, to your GitHub repository) in your email so that we can best help you.
I don't want to use renv to install packages for my Shiny app. What is the alternative?
While using reproducible environments is best practice, you may have a reason to not want to use them. In those cases you can build your Docker image differently. Instead of the lines in the Dockerfile where the package renv is installed and the environment is restored, you can do something like this.
# Install R packages manually
# Command to install standard R packages from CRAN; enter the list of required packages for your app here
RUN Rscript -e 'install.packages(c("shiny","tidyverse","BiocManager"), dependencies = TRUE)'
# Command to install packages from Bioconductor; enter the list of required Bioconductor packages for your app here
RUN Rscript -e 'BiocManager::install(c("Biostrings"),ask = F)'
In this example we manually installed the following. From the standard R packages: shiny, tidyverse, and BiocManager. This was done in the line RUN Rscript -e 'install.packages(c("shiny","tidyverse","BiocManager"), dependencies = TRUE)'. Add your own packages here as needed by your app. In addition, one package was installed from Bioconductor - Biostrings. This was done in the line RUN Rscript -e 'BiocManager::install(c("Biostrings"),ask = F)'. Add your Bioconductor packages here. The rest of the Dockerfile stays the same.
Can my app be hosted at a top-level domain, such as www.example.org?
Yes, it is possible. Your app will then be available at both x.serve.scilifelab.se and your own example.org. To do this, you will need to purchase a domain name yourself and set up DNS settings that you will get from us. Get in touch with us (serve@scilifelab.se) so that we can arrange this for you.
Can my app contain sensitive data?
No, SciLifeLab Serve does not support hosting of apps with sensitive data.
How many users can use my app simultaneously?
Currently, we do not have a specific enforced limit on the number of concurrent users. We try to accomodate as many users as possible but cannot at this point make promises about a minimum number of users.
Can different users see each other's work/data inside my Shiny app?
No, they cannot. SciLifeLab Serve launches a new copy of your app for each new user that opens it. Different users do not have access to each others' copies. Each user's copy is deleted as soon as the user closes their browser tab.
The external links from my app do not work on Serve although they work on my computer locally. What can I do?
If your app contains links to external websites, by default Shiny will try to open them in the same browser tab as the Shiny app itself. It is however not possible to open external URLs within the same browser tab when the app is published on SciLifeLab Serve. This is why you may see that nothing happens when you click on a link. To solve this, you simply need to make the link open in a new tab/new window by default. This is done by adding a target="_blank" attribute to your link. You can find different resources online for how to do it. If you run into issues with this, get in touch with us.
How much CPU and RAM/memory does Serve allocate to my app?
Please find the default allocation in the text of this page above. If you would like for your app to be allocated more than the default amount of resources, get in touch with us (serve@scilifelab.se) with a motivation.
What resource allocations will my app need on Serve?
You can always deploy your app with default resource allocations and observe its performance, most apps do not need more than the default allocations. If your app is not performing well and you are unsure how to test what it needs, let us know and we can help you.
Why is my Shiny app slow?
If your app is significantly slower on Serve than on your own laptop, it may need to be assigned more hardware resources to function well. Get in touch with the us on serve@scilifelab.se and describe your situation, we will give you more resources if needed. If your app is also slow on your computer, you need to optimize your app for better performance. There are a number of good tips and tutorials online for how you can improve your app performance, see for example: "Managing long-running operations in Shiny" (video), Faster Shiny apps with profiling tools" (video), "Asynchronous programming in Shiny" (examples), "Engineering Production-grade Shiny apps" (book). When you are optimizing your app, keep in mind that you are using Shiny Server packaged as a Docker image to deploy your app on SciLifeLab Serve.
My Shiny app takes a long time to start and/or displays a blank white page during loading.
You can attempt to re-engineer the Shiny app to not load a large dataset at once, but rather as needed. This may solve some issues. It may also be good to display a fast-loading index or start page, and only load a dataset if needed behind a query or presentation view.
Yet another option is to display the standard or a custom version of the Shiny proxy navbar at the top.
How can I test my Shiny app?
When you have a complex application that is going to be used by many people it is recommended to create different tests that you can run in order to ensure your app works correctly and that it will perform well. There are dedicated tools that make it easier for Shiny apps. We recommend shinytest2 for making sure that various parts of your application work correctly (i.e. unit testing) and shinyloadtest for simulating many users using your app simultaneously to test performance (i.e. load testing). You can also use profvis to understand which processes take longer time. These tools can get somewhat complex, and they do not necessarily need to be used for all apps. We recommend considering how much impact your app will make and investing an appropriate amount of time in testing. There are also some useful materials online, for example: "Mastering Shiny: Testing" (book), "Shiny testing overview" (text), "Shiny in production: Principles, practices, and tools (video), "Shiny in Production workshop materials" (text),
I updated the image in the app settings, why do I still see the old version?
We require that each version of your app has a unique Docker image tag. When an app has been deployed once using an image with a certain tag it will no longer be possible to fetch an updated image with an identical tag. Therefore, you need to publish your image with a new unique tag and change the image address in the app settings to include this new tag. In other words, instead of using "image:latest" for all of your versions you should be using unique tags for each version, e.g. "image:v3" or "image:20240125". Still seeing the same version despite publishing your Docker image with a new tag? Send us an email to serve@scilifelab.se, and we can take a look what went wrong in that case.
Can I keep my app private while my article/conference submission is under review?
Yes, it is possible to publish an app in such a way that only those with a URL can open it. To do that, choose "Link" option in the Permissions field of the app settings. In this case those who you share the link with (for example, reviewers of your article) will be able to open it but not anyone else.
Can I get a DOI (Digital Object Identifier) for my app?
Yes, all applications published with permission level Public receive a DOI. You can read more about DOIs here.
Can I host a private app for my research group?
No, each app on SciLifeLab Serve needs to be made public eventually. The apps can only stay private while you are still developing it or while it is under peer review.
How do I update or delete my app after it has been published?
Please find the answer in the text of this page.
Can I delete/hide my Docker image after my app is published?
No, the Docker images need to stay available at all times. SciLifeLab Serve is regularly fetching the image again. If it is not available, your app will stop working.
Where can I see logs of what my Shiny application is doing?
Currently, the logs displayed on SciLifeLab Serve for Shiny apps only have limited value. It is not currently possible to see the logs from the Shiny application itself, only from the software that lies between Serve and the Shiny application. Hence, we advice to use your own computer to debug and resolve issues as described below. If your application is running smoothly on your own computer when you run it as described above, it should also run without issues on Serve.
When running your Docker image on your computer, there are two things you can look at. One of these are the logs of the container in general which show what the whole container is doing. The easiest way to do it is to simply click on "Details" in the Docker Desktop application. Here you should see that the application has been launched and is available at port 3838 or if there was an issue.
Another log you can look at is actually all the output from the currently runnin Shiny app. This is like seeing the output when the Shiny app runs in RStudio. For that, in your Docker Desktop find the option to go into Terminal for that container. In there you need to navigate to var/log/shiny-server folder (for example, run 'cd var/log/shiny-server'). There you should see files with logs of running your application (for example, run 'ls'). You can open and read them (for example, run 'cat name.log').
Can I see how many users are accessing my application?
At the moment we do not track such statistics. We plan to implement this at some point in the future.
Can I embed my app on another website using an inline frame (iframe)?
Yes, you can do that. We do not restrict embedding of the apps hosted on SciLifeLab Serve into other websites.
Is there a size limit for a file I want to upload when using the app?
Yes, for Shiny apps, the upload size limit is 100MB. If your project requires uploading files with larger size, contact us at serve@scilifelab.se
The SciLifeLab Serve user guide is powered by django-wiki, an open source application under the GPLv3 license. Let knowledge be the cure.